Ace of spoons
  • Home
  • Recipes
  • Categories
    • No Bake
    • Breakfast
    • Brownies and Bars
    • Cakes
    • Main Dishes
    • Baked goods & Pastries
  • About
  • Contact
Top Posts
No Churn Vanilla Ice Cream
 Ultimate Cookie Dough Ice Cream
Lemon Loaf Cake
Sugar Cookie Bars
No Churn Tiramisu Ice Cream
Roasted Red Pepper Pasta
Smoked Maple Orange Old Fashioned
How to Make Caramel 101
No Bake Oreo Raspberry Cheesecake
Banana Bread Pancakes 
Ace of spoons
  • Home
  • Recipes
  • Categories
    • No Bake
    • Breakfast
    • Brownies and Bars
    • Cakes
    • Main Dishes
    • Baked goods & Pastries
  • About
  • Contact
Ace of spoons
Ace of spoons
  • Home
  • Recipes
  • Categories
    • No Bake
    • Breakfast
    • Brownies and Bars
    • Cakes
    • Main Dishes
    • Baked goods & Pastries
  • About
  • Contact
Brownies and Bars

Christmas Brownies Recipe (cosmic brownies)

by Hunar Baig 20th December 2022
written by Hunar Baig

Christmas Brownies Recipe (cosmic brownies)

Brownies are perfect all year round, but these are special brownies, for the most wonderful time of the year! They are dense, fudgy brownies, flavoured with classic xmas spices and clementines, topped with a thick, shiny ganache, and some fun festive sprinkles. Like, a cosmic christmas brownie.

What makes these brownies festive? 

For starters, they look super festive, but really, it’s the clementine zest that adds a fresh zesty flavour, chocolate and orange is such a xmas flavour to me, so I felt it fit perfectly here. The other thing is the spices, cinnamon, nutmeg and cardamom add a rich spiced flavour, that works so well with the chocolate.

Ingredient Notes

The ingredients that go into these delicious Christmas Brownies 

Butter – provides moisture and fat, while making the brownies super fudgy and adds a lot of flavour

Chocolate – adds so much flavour, depth and helps to get that crackly top

Eggs – binds the brownies together, makes them fudgy and helps us achieve a shiny top

Caster Sugar – of course! To sweeten the brownies

Light Brown Sugar – will sweeten the brownies and add some chew

Espresso Powder or Instant Coffee – adds so much flavour and richness

Ground Cinnamon, Cardamom & Nutmeg  – they add so much flavour and warmth

Clementine Zest  – for that classic chocolate orange christmas flavour 

Salt – balances everything out and enhances all of the flavours

Vanilla Paste or Vanilla Extract – adds so much flavour, depth and that classic vanilla smell

Plain Flour – is the perfect base for these brownies

Cocoa Powder – adds so much flavour, depth and that classic chocolate taste

Ganache Topping Ingredients

Double or Heavy Cream – is the base for this ganache 

Chocolate – duh! This is a chocolate ganache of course

Butter – will make the ganache thick and shiny

Vanilla Paste or Vanilla Extract – adds so much flavour, depth and that classic vanilla smell

Salt – balances everything out and enhances the chocolate flavour

Sprinkles – will add some colour and festive flair

How to make Christmas Brownies – step by step

  1. Preheat an oven to 175 celsius / 350 fahrenheit / gas mark 4.
  2. Melt the butter and chocolate together in a saucepan, on a low heat (or in the microwave, in a microwave safe bowl).
  3. In a large bowl, add in the sugars, spices and clementine zest and rub together with the pads of your fingers.
  4. Then, crack in the eggs and whisk with a hand mixer, stand mixer or whisk, for around 5 minutes or until the mixture is light, pale and fluffy.
  5. Now, pour the cooled butter and chocolate mixture into the egg mixture and fold in gently.
  6. Finally, sift in the flour and cocoa powder, and combine. Being very careful not to overmix! 
  7. Pour the brownie batter into a lined 9×9 inch baking pan and bake for 20 – 25 minutes. To check when the brownies are done, insert a toothpick into the centre, it should have a few crumbs on it.
  8. To make the ganache, pour the cream into a small saucepan and add the chocolate, vanilla and salt. Cook on a low heat, stirring frequently, until the chocolate has melted and the ganache is shiny!
  9. Once the brownies are baked and at room temperature, pour over the ganache and smooth evenly, then top with the sprinkles.
  10. Place the brownies into the fridge to set for 1 hour or at room temp for 2 hours.
  11. Finally, use a sharp knife to cut the brownies into 16 squares and enjoy!

What is a Cosmic Brownie made of?

Cosmic brownies are a rich, fudgy brownie, topped with a shiny chocolate frosting, similar to ganache but more like a fudge sauce than a ganache. Then, the brownies are topped with some fun, colourful and crisp sprinkles, as a finishing touch. They are super dense, but soft and moist at the same time, and the chocolate topping adds another layer of richness and depth.

What is the secret of a fudgy brownie?

The secret to a fudgy brownie is having a higher fat to flour ratio, in this case butter, chocolate and the egg yolk in the eggs, are more than the flour and cocoa powder. This makes the fudgiest brownies!

How to store these Christmas Brownies? 

Store these brownies in an airtight container or tin, once the ganache has fully set, stored at room temperature and they should last for about 3 days. Or, store in the fridge for a chewer brownie experience, and they will last for around a week.

Tips and Tricks – Christmas Brownies Recipe

  • Use a Toothpick – to check when the brownies are done, it should have a few crumbs on it
  • Store the Brownies – in a airtight container or tin, once the ganache has fully set and store at room temperature, they should last for about 3 days
  • Use Dutch Processed Cocoa – for the best flavour profile and chocolate taste
  • If you don’t like cinnamon, cardamom or nutmeg – simply leave it out!
  • To cut the brownies – use a sharp knife and clean it in between cuts, for a professional look
  • The recipe video is on my Tik Tok and IG  â€“ please tag @aceofspoons_ if you make this recipe

Christmas Brownies Recipe (cosmic brownies)

Hunar Baig
Brownies are perfect all year round, but these are special brownies, for the most wonderful time of the year! They are dense, fudgy brownies, flavoured with classic xmas spices and clementines, topped with a thick, shiny ganache, and some fun festive sprinkles. Like, a cosmic christmas brownie.
Print Recipe Pin Recipe
Prep Time 30 minutes mins
Cook Time 30 minutes mins
Total Time 1 hour hr
Course Dessert
Cuisine American
Servings 16 brownies

Equipment

  • 9×9 inch square baking pan
  • Large bowl
  • Whisk
  • Small saucepan

Ingredients
  

Brownie Ingredients

  • 150 g butter 10.5 tbsp
  • 150 g dark chocolate 5.5 oz
  • 200 g caster sugar 1 cup
  • 100 g light brown sugar 1/2 cup
  • 3 eggs
  • 1/4 tsp salt
  • 1/2 tsp espresso powder (or instant coffee, diluted in 2 tbsp of water)
  • 2 tsp vanilla extract
  • 1/2 tsp ground cinnamon
  • 1/4 tsp ground nutmeg
  • 1/4 tsp ground cardamom
  • zest of 2 clementines
  • 120 g plain flour 1 cup
  • 60 g cocoa powder 1/4 cup

Ganache Ingredients

  • 150 ml double cream 5.5 oz
  • 150 g semi-sweet chocolate (or you could use half milk and dark chocolate) 5.5 oz
  • 2 tbsp butter
  • 1 tsp vanilla extract
  • a sprinkle of flaky salt
  • Sprinkles to top the brownies

Instructions
 

  • Preheat an oven to 175 celsius / 350 fahrenheit / gas mark 4.
  • Melt the butter and chocolate together in a saucepan, on a low heat (or in the microwave, in a microwave safe bowl).
  • In a large bowl, add in the sugars, spices and clementine zest and rub together with the pads of your fingers.
  • Then, crack in the eggs and whisk with a hand mixer, stand mixer or whisk, for around 5 minutes or until the mixture is light, pale and fluffy.
  • Now, pour the cooled butter and chocolate mixture into the egg mixture and fold in gently.
  • Finally, sift in the flour and cocoa powder, and combine. Being very careful not to overmix!
  • Pour the brownie batter into a lined 9×9 inch baking pan and bake for 20 – 25 minutes. To check when the brownies are done, insert a toothpick into the centre, it should have a few crumbs on it.
  • To make the ganache, pour the cream into a small saucepan and add the chocolate, vanilla and salt. Cook on a low heat, stirring frequently, until the chocolate has melted and the ganache is shiny!
  • Once the brownies are baked and at room temperature, pour over the ganache and smooth evenly, then top with the sprinkles.
  • Place the brownies into the fridge to set for 1 hour or at room temp for 2 hours.
  • Finally, use a sharp knife to cut the brownies into 16 squares and enjoy!

Notes

  • Use a Toothpick – to check when the brownies are done, it should have a few crumbs on it
  • Store the Brownies – in a airtight container or tin, once the ganache has fully set and store at room temperature, they should last for about 3 days
  • Use Dutch Processed Cocoa – for the best flavour profile and chocolate taste
  • If you don’t like cinnamon, cardamom or nutmeg – simply leave it out!
  • To cut the brownies – use a sharp knife and clean it in between cuts, for a professional look
Keyword Brownie, Chocolate
20th December 2022 1 comment
0 FacebookTwitterPinterestPocketEmail
Breakfast

Best Pumpkin Pancakes with Homemade Cinnamon Butter

by Hunar Baig 19th December 2022
written by Hunar Baig

Best Pumpkin Pancakes with Homemade Cinnamon Butter

These pumpkin pancakes are soft, fluffy, with a crisp edge, packed with tons of flavour and chocolate chips! The cinnamon butter is made with browned butter, it is creamy, salty, sweet, and perfectly spiced. I was inspired to make these after I watched an episode of Gilmore Girls where Luke Danes made pumpkin pancakes with homemade cinnamon butter.

Ingredient Notes

The ingredients that go into these delightful Pumpkin Pancakes with Homemade Cinnamon Butter

Plain Flour – provides the perfect base for these light & fluffy pumpkin pancakes

Baking Powder & Soda– adds so much lightness and height to the pancakes

Eggs – binds the pancakes together and adds more lightness

Oil – provides moisture and fat, while also softening the pancakes 

Buttermilk – will add moisture and make the pancakes softer

Pumpkin Puree – of course! We need pumpkin puree to make pumpkin pancakes

Caster Sugar – to sweeten the pancakes

Light Brown Sugar – makes the pancakes, sweeter and adds depth 

Pumpkin Pie Spice  – adds so much flavour and warmth

Salt – balances everything out and enhances all of the flavours

Vanilla Paste or Vanilla Extract – adds so much flavour, depth and that classic vanilla smell

Chocolate Chips – works so well with the pumpkin flavour 

Cinnamon Butter Ingredients

Butter – is the base for the cinnamon butter

Cinnamon – of course! This is cinnamon butter after all

Icing Sugar – adds some sweetness 

Vanilla Paste or Vanilla Extract – will add some flavour and depth

Sea Salt – balances everything out, though you can leave it out, if you’re using salted butter!

How to make Pumpkin Pancakes – step by step

  1. In a large bowl, sift together flour, baking powder, and spices, then mix in the salt and sugar, and mix.
  2. In a separate bowl, whisk together the pumpkin puree, eggs, buttermilk and oil.
  3. Next, add the chocolate chips into the flour mixture and combine.
  4. Now, fold in the wet mixture and dry mixture together, but don’t overmix! Allow the batter to sit for 10 minutes.
  5. Heat a pancake pan or nonstick pan, on a low heat and pour in the pancake batter, half a cup at a time. Once loads of bubbles rise to the surface and pop, it’s time to flip to the other side, and cook for a minute or two more until fully cooked on the bottom. Repeat this process with all of your pancakes, greasing the pan with some cooking spray, butter or oil, in between, if needed. 
  6. Now, simply serve with the cinnamon butter, maple syrup, or any other toppings you’d like and enjoy!

4 Tricks for the Fluffiest Pumpkin Pancakes

  1. Let the pancake batter to sit for 10 minutes, it will make the batter thicker as the gluten in the flour will absorb the moisture in the batter, resulting in softer pancakes 
  1. Cook the pancakes on a low heat throughout, this will ensure that the pancakes rise evenly and become fluffy 
  1. This recipe calls for both baking powder and soda as the pumpkin puree can be heavy, and the baking powder and soda makes sure the pancakes are super light and fluffy
  1. DON’T overmix the batter. Stir your batter until the dry and wet ingredients are just incorporated. That means mixing until the flour streaks have disappeared, but leaving the small pesky lumps. If you over-mix, the pancakes will be chewy instead of fluffy.

How to make Homemade Cinnamon Butter – step by step

  1. Start by browning the butter in a saucepan, over medium, low heat, stirring constantly until the butter begins to foam and turns a golden brown, emitting a nutty aroma. Make sure you only brown the butter lightly.
  2. Fill a large metal bowl with ice and cold water and place a smaller metal bowl inside of it, making sure there is no water inside the smaller bowl.
  3. Pour the brown butter into the smaller bowl and add in the cinnamon, icing sugar, salt and vanilla.
  4. Whisk until you get a thick, creamy and smooth consistency and the butter is ready!

How to store Homemade Cinnamon Butter?

Store in a clean, dry jar or container, at room temp for 1 – 2 days, or in the fridge, for at least 2 weeks.

Tips and Tricks – Pumpkin Pancakes with Homemade Cinnamon Butter

  • Use a nonstick pan or a pancake pan – to make these pancakes super easy to make 
  • Let the batter rest for 10 minutes – for softener, fluffier pancakes and a thicker batter 
  • If you don’t have any pumpkin spice – there is a recipe for it on my socials, or you could replace it with ½ tsp of cinnamon
  • Cook on a low heat – for the softest and lightest pancakes
    The recipe video is on my Tik Tok and IG  – please tag @aceofspoons_ if you make this recipe

Pumpkin Pancakes with Homemade Cinnamon Butter

Hunar Baig
These pumpkin pancakes are soft, fluffy, with a crisp edge, packed with tons of flavour and chocolate chips! The cinnamon butter is made with browned butter, it is creamy, salty, sweet, and perfectly spiced.
Print Recipe Pin Recipe
Prep Time 15 minutes mins
Cook Time 40 minutes mins
Cinnamon Butter 20 minutes mins
Total Time 1 hour hr 15 minutes mins
Course Breakfast, Brunch
Cuisine American
Servings 12 pancakes

Equipment

  • Non stick or pancake pan
  • Large bowl
  • Whisk
  • Saucepan

Ingredients
  

Pumpkin Pancake Ingredients

  • 240 g plain flour 2 cups
  • 2 tsp baking powder
  • 1/2 tsp baking soda
  • 1 tsp pumpkin spice (or 1/2 tsp cinnamon, if you prefer)
  • 1/4 tsp salt
  • 70 g light brown sugar 1/3 cup
  • 2 eggs
  • 250 g pumpkin puree 1 cup
  • 30 ml cooking oil. any neutral oil will do, vegetable oil, rapeseed oil or sunflower oil. 1/4 cup
  • 250 ml buttermilk 1 cup
  • 1 tsp vanilla extract or paste
  • 85 – 170 g chocolate chips (depending on how chocolatey you'd like it.) 1/2 – 1 cup

Cinnamon Butter Ingredients

  • 115 g butter 8 tbsp
  • 1 tsp ground cinnamon
  • 3 tbsp icing sugar
  • 1 tsp vanilla extract
  • a sprinkle of flaky sea salt

Instructions
 

Pumpkin Pancake Method

  • In a large bowl, sift together flour, baking powder, and spices, then mix in the salt and sugar, and mix.
  • In a separate bowl, whisk together the pumpkin puree, eggs, buttermilk and oil.
  • Next, add the chocolate chips into the flour mixture and combine.
  • Now, fold in the wet mixture and dry mixture together, but don’t overmix! Allow the batter to sit for 10 minutes.
  • Heat a pancake pan or nonstick pan, on a low heat and pour in the pancake batter, half a cup at a time. Once loads of bubbles rise to the surface and pop, it's time to flip to the other side, and cook for a minute or two more until fully cooked on the bottom. Repeat this process with all of your pancakes, greasing the pan with some cooking spray, butter or oil, in between, if needed.
  • Now, simply serve with the cinnamon butter, maple syrup, or any other toppings you’d like and enjoy!

Cinnamon Butter Method

  • Start by browning the butter in a saucepan, over medium, low heat, stirring constantly until the butter begins to foam and turns a golden brown, emitting a nutty aroma. Make sure you only brown the butter lightly.
  • Fill a large metal bowl with ice and cold water and place a smaller metal bowl inside of it, making sure there is no water inside the smaller bowl.
  • Pour the brown butter into the smaller bowl and add in the cinnamon, icing sugar, salt and vanilla.
  • Whisk until you get a thick, creamy and smooth consistency and the butter is ready!

Notes

  • Use a nonstick pan or a pancake pan – to make these pancakes super easy to make 
  • Let the batter rest for 10 minutes – for softener, fluffier pancakes and a thicker batter 
  • If you don’t have any pumpkin spice – there is a recipe for it on my socials, or you could replace it with ½ tsp of cinnamon
  • Cook on a low heat – for the softest and lightest pancakes
Keyword Cinnamon, Pancakes, Pumpkin
19th December 2022 0 comments
0 FacebookTwitterPinterestPocketEmail
Brownies and BarsCookies and biscuits

Chai Sugar Cookie Bars

by Hunar Baig 19th December 2022
written by Hunar Baig

Chai Sugar Cookie Bars 

These chai sugar cookie bars are SO soft and chewy on the inside and crisp on the outside, topped with a dreamy maple, cream cheese frosting and cinnamon sugar. The best part is there is no chilling, rolling, scooping or cutting, just easy, simple and delicious chewy, chai sugar cookie bars.

What is Chai? 

Chai translates to tea and in this case more specifically black tea. Originating in India, chai or masala chai is black tea, brewed with water, milk and spices.

What is chai spice made of?

The spices in chai are cinnamon, ginger, cloves, black pepper, and cardamom. They can vary in the type of spices and the quantity of each spice, the goal is to create a harmonious spice mix that works well with the bold flavour of the black tea.

Ingredient Notes

The ingredients that go into these delightful Chai Sugar Cookie Bars 

Plain Flour – provides the perfect base for these soft & chewy chai sugar cookie bars

Baking Powder – adds so much lightness and height to the sugar cookie bars

Eggs – binds the bars together and adds more fat

Melted Butter – provides moisture and fat, while also making sure the cookies stay soft

Caster Sugar – of course! To sweeten the cookie bars

Light Brown Sugar – will make the cookie bars chewy and add a gingerbread flavour 

Clementine Zest – gives the sugar cookie bars, so much flavour and freshness

Ground Cinnamon, Cloves, Ginger, Black Pepper, Cardamom & Nutmeg  – is the chai spice mix for these sugar cookie bars

Salt – balances everything out and enhances all of the flavours

Vanilla Paste or Vanilla Extract – adds so much flavour, depth and that classic vanilla smell – I prefer paste as it adds little flecks of vanilla seeds to the cookie bars, which are just gorgeous 

Maple Cream Cheese Frosting Ingredients

Cream Cheese – is the base for the frosting 

Butter – will make the frosting thicker and slightly creamier

Icing Sugar – is the base for this frosting and provides so much sweetness

Vanilla Paste or Vanilla Extract – for a ton of vanilla flavour

Maple Syrup – makes the frosting delicious and sweet

Taylor Swift’s Chai Sugar Cookies Recipe:

These chai sugar cookie bars are inspired by Taylor Swift’s famous chai sugar cookie recipe and a classic gingerbread cookie. I wanted to combine the two and create spiced, cookie bars that pack a ton of flavour and are super easy to make! I absolutely love Taylor and am a huge fan of her recipe, which is actually an adaptation of a recipe from the amazing joyofbaking.com. RECIPE HERE

How to make Chai Sugar Cookie Bars – step by step

  1. Preheat an oven to 180 celsius / 355 fahrenheit / gas mark 4.
  2. In a large bowl, add in the sugars, spices, salt and clementine zest and rub together with the pads of your fingers.
  3. Then, add in the melted butter and mix well.
  4. Next, crack in the eggs and combine.
  5. Now, fold in the dry ingredients and stir until fully combined.
  6. Evenly spread the sugar cookie dough into a lined 9×9 inch square baking pan.
  7. Bake for 22 – 25 minutes or until the chai cookie bars are golden brown and a toothpick inserted comes out clean. Allow to fully cool on a wire rack.
  8. Now, for the frosting. In a large bowl whip together the cream cheese and butter until light and fluffy.
  9. Then, add in the maple and vanilla and mix well.
  10. Finally, add in the icing sugar in three parts, whipping the frosting each time, until you have a light, fluffy frosting that isn’t too thick.
  11. To make the cinnamon sugar, simply mix the cinnamon and sugar together in a small bowl.
  12. Top the chai sugar cookie bars with the maple frosting and a sprinkling of cinnamon sugar and cut into 9 large bars or 16 small ones, serve and enjoy!

How to make Sugar Cookie Bars Chewy?

The trick that makes these sugar cookie bars soft and chewy for days, is under baking them, like a lot! They may even feel cakey when you take them out of the oven, but as they cool off they become crisp on the outside and stay chewy in the middle.

How to store Chai Sugar Cookie Bars?

Store these delicious chewy chai sugar cookie bars in an airtight container or tin, once the frosting has fully set, store at room temperature and they should last for about a week!

Tips and Tricks – Chai Sugar Cookie Bars

  • Use a chopstick –  to test when the chai sugar cookie bars are done
  • Store the chai sugar cookie bars – in a airtight container or tin, once the frosting has fully set and store at room temperature, they should last for about a week
  • Line the baking pan – with parchment paper and you can use metal binder clips on the sides, for a clean look and easy removal 
  • If you don’t like the spices used – use any chai spice mix you’d like
  • To cut the cookie bars – use a sharp knife for a clean and professional look
  • For more chai flavour – you could add the contents of your favourite tea bag to the cookie dough
    The recipe video is on my Tik Tok and IG  â€“ please tag @aceofspoons_ if you make this recipe

Chai Sugar Cookie Bars

Hunar Baig
These chai sugar cookie bars are SO soft and chewy on the inside and crisp on the outside, topped with a dreamy maple, cream cheese frosting and cinnamon sugar. The best part is there is no chilling, rolling, scooping or cutting, just easy, simple and delicious chewy, chai sugar cookie bars.
Print Recipe Pin Recipe
Prep Time 20 minutes mins
Cook Time 20 minutes mins
Total Time 40 minutes mins
Course Cookies, Dessert
Servings 9 large bars or 16 small bars

Equipment

  • 9×9 inch square baking pan
  • small palette knife
  • Large bowl

Ingredients
  

  • 125 g butter (melted) 1/2 cup
  • 200 g caster sugar 1 cup
  • 100 g light brown sugar 1/2 cup
  • 2 tsp vanilla extract or paste
  • 2 eggs
  • zest of 2 clementine
  • 1 tsp baking powder
  • 1/4 tsp salt
  • 1 tsp cinnamon
  • 1 tsp ground ginger
  • 1/4 tsp ground nutmeg
  • 1/4 tsp ground cloves
  • 3 cardamom pods – seeds crushed (remove the green outer pods)
  • 1/8 tsp black
  • 240 g plain flour 2 cups

Maple & Cream Cheese Frosting

  • 110 g cream cheese 1/4 cup
  • 50 g softened butter 3.5 tbsp
  • 50 ml maple syrup
  • 1 tsp vanilla extract or paste
  • 130 g icing sugar 1 cup

Instructions
 

  • Preheat an oven to 180 celsius / 355 fahrenheit / gas mark 4.
  • In a large bowl, add in the sugars, spices, salt and clementine zest and rub together with the pads of your fingers.
  • Then, add in the melted butter and mix well.
  • Next, crack in the eggs and combine.
  • Now, fold in the dry ingredients and stir until fully combined.
  • Evenly spread the sugar cookie dough into a lined 9×9 inch square baking pan.
  • Bake for 22 – 25 minutes or until the chai cookie bars are golden brown and a toothpick inserted comes out clean. Allow to fully cool on a wire rack.
  • Now for the frosting. In a large bowl whip together the cream cheese and butter until light and fluffy.
  • Then, add in the maple and vanilla and mix well.
  • Finally, add in the icing sugar in three parts, whipping the frosting each time, until you have a light, fluffy frosting that isn’t too thick.
  • To make the cinnamon sugar, simply mix the cinnamon and sugar together in a small bowl.
  • Top the chai sugar cookie bars with the maple frosting and a sprinkling of cinnamon sugar and cut into 9 large bars or 16 small ones, serve and enjoy!

Notes

  • Use a chopstick –  to test when the chai sugar cookie bars are done
  • Store the chai sugar cookie bars – in a airtight container or tin, once the frosting has fully set and store at room temperature, they should last for about a week
  • Line the baking pan – with parchment paper and you can use metal binder clips on the sides, for a clean look and easy removal 
  • If you don’t like the spices used – use any chai spice mix you’d like
  • To cut the chai sugar cookie bars – use a sharp knife for a clean and professional look
  • For more chai flavour – you could add the contents of your favourite tea bag to the cookie dough
Keyword Chai, Cookies
19th December 2022 0 comments
0 FacebookTwitterPinterestPocketEmail
CoffeeDrinks and smoothies

Starbucks Pumpkin Spice Sauce (Syrup) Recipe

by Hunar Baig 7th November 2022
written by Hunar Baig

Starbucks Pumpkin Spice Sauce (Syrup) Recipe

The pumpkin spice sauce recipe is made with condensed milk, pumpkin puree and spice and has syrup mixed right in. It is a copy of the starbucks one but, so easy, cost effective and absolutely delicious. This recipe is a staple for the fall and can be used in both hot and cold, coffee and tea!

What is pumpkin spice sauce made of?

Pumpkin spice sauce is a mix of condensed milk, pumpkin puree and syrup, flavoured with pumpkin pie spice. This gives you the best of both worlds, you get a syrup and a rich pumpkin sauce all in one!

Ingredient Notes

The ingredients that go into this easy & delicious pumpkin spice sauce (syrup)

Light brown sugar – for the syrup to add into the sauce, adds so much sweetness

Water – is the base for the syrup

Pumpkin Puree – for that, sweet, nutty and rich pumpkin flavour

Condensed Milk – provides a sweet base for the sauce and adds some creaminess 

Pumpkin Spice – of course! What would pumpkin spice sauce be without pumpkin spice

Vanilla Paste or Extract – adds so much flavour, depth and that classic vanilla smell

Salt – balances everything out and enhances all of the flavours

How to make Pumpkin Spice Sauce (Syrup) – step by step

  1. Make the syrup by boiling together the sugar and water in a saucepan until, all the sugar completely dissolves, then take off the heat 
  2. Whisk together the condensed milk, pumpkin puree, pumpkin spice, vanilla and salt. Until there are no lumps left.
  3. Pour in the warm syrup into the pumpkin mixture, and whisk together. (Make sure the syrup isn’t hot!)
  4. Once the sauce has cooled to room temperature, pour in a jar or bottle and place into the fridge. Ready to use at a moment’s notice!

How do you use pumpkin spice sauce:

This pumpkin spice sauce can be used for both hot and cold coffee, tea and even in a frappuccino or a pumpkin milkshake.

Here are some my favourite ways to use it:

  • The classic pumpkin spice latte
  • A delicious iced pumpkin spice latte
  • An icy cold and sweet pumpkin spice frappuccino 
  • Brown sugar shaken pumpkin spice oat milk espresso, topped with a pumpkin spice cold foam

How should you store pumpkin spice sauce? 

The pumpkin spice sauce should be stored in a clean airtight jar or syrup bottle and stored into the fridge. Make sure that the sauce is at room temp before storing away.

How long does pumpkin spice sauce last?

It will last for about 2 weeks, if stored properly. Make sure to store it in the fridge and in a clean jar!

What does Starbucks use for their pumpkin sauce?

Starbucks uses a mixture of condensed milk, syrup and pumpkin puree and spice to make their pumpkin spice lattes. Now, for the pumpkin spice itself, that is a mixture of cinnamon, ginger, nutmeg, cloves and allspice.

Tips and Tricks – Starbucks Pumpkin Spice Sauce (Syrup) Recipe

  • Use 4 tbsp –  of pumpkin spice sauce per drink, this is about 2 pumps in starbucks terms
  • This sauce makes – around 15 servings, if using 4 tbsp per drink!
  • Store the pumpkin spice syrup – in a airtight jar or pouring bottle and store in the fridge for up to 2 weeks
  • If you don’t have pumpkin spice – simply follow my recipe HERE

The recipe video is on my Tik Tok and IG  – please tag @aceofspoons_ if you make this recipe

Starbucks Pumpkin Spice Sauce (Syrup) Recipe

Hunar Baig
The pumpkin spice sauce recipe is made with condensed milk, pumpkin puree and spice and has syrup mixed right in. It is a copy of the Starbucks one but, so easy, cost effective and absolutely delicious. This recipe is a staple for the fall and can be used in both hot and cold, coffee and tea!
Print Recipe Pin Recipe
Prep Time 5 minutes mins
Cook Time 5 minutes mins
Total Time 10 minutes mins
Course Coffee
Cuisine American
Servings 15 servings

Equipment

  • Saucepan
  • Mixing bowl
  • Pouring bottle or Jar

Ingredients
  

  • 1 can condensed milk 397g / 14oz
  • 115 g pumpkin puree 1/2 cup
  • 100 g light brown sugar 1/2 cup
  • 125 ml water 1/2 cup
  • 1 tsp pumpkin spice
  • 1 tsp vanilla paste (or 2 tsp vanilla extract)
  • 1/4 tsp salt

Instructions
 

  • Make the syrup by boiling together the sugar and water in a saucepan until, all the sugar completely dissolves, then take off the heat
  • Whisk together the condensed milk, pumpkin puree, pumpkin spice, vanilla and salt. Until there are no lumps left.
  • Pour in the warm syrup into the pumpkin mixture, and whisk together. (Make sure the syrup isn't hot!)
  • Once the sauce has cooled to room temperature, pour in a jar or bottle and place into the fridge. Ready to use at a moment's notice!

Notes

  • Use 4 tbsp –  of pumpkin spice sauce per drink, this is about 2 pumps in Starbucks terms
  • This sauce makes – around 15 servings, if using 4 tbsp per drink!
  • Store the pumpkin spice syrup – in a airtight jar or pouring bottle and store in the fridge for up to 2 weeks
Keyword Pumpkin
7th November 2022 0 comments
0 FacebookTwitterPinterestPocketEmail
Baked goods & PastriesBreadBreakfastDesserts

Easy Chocolate Chip Banana Bread Recipe

by Hunar Baig 6th November 2022
written by Hunar Baig

Easy Chocolate Chip Banana Bread Recipe

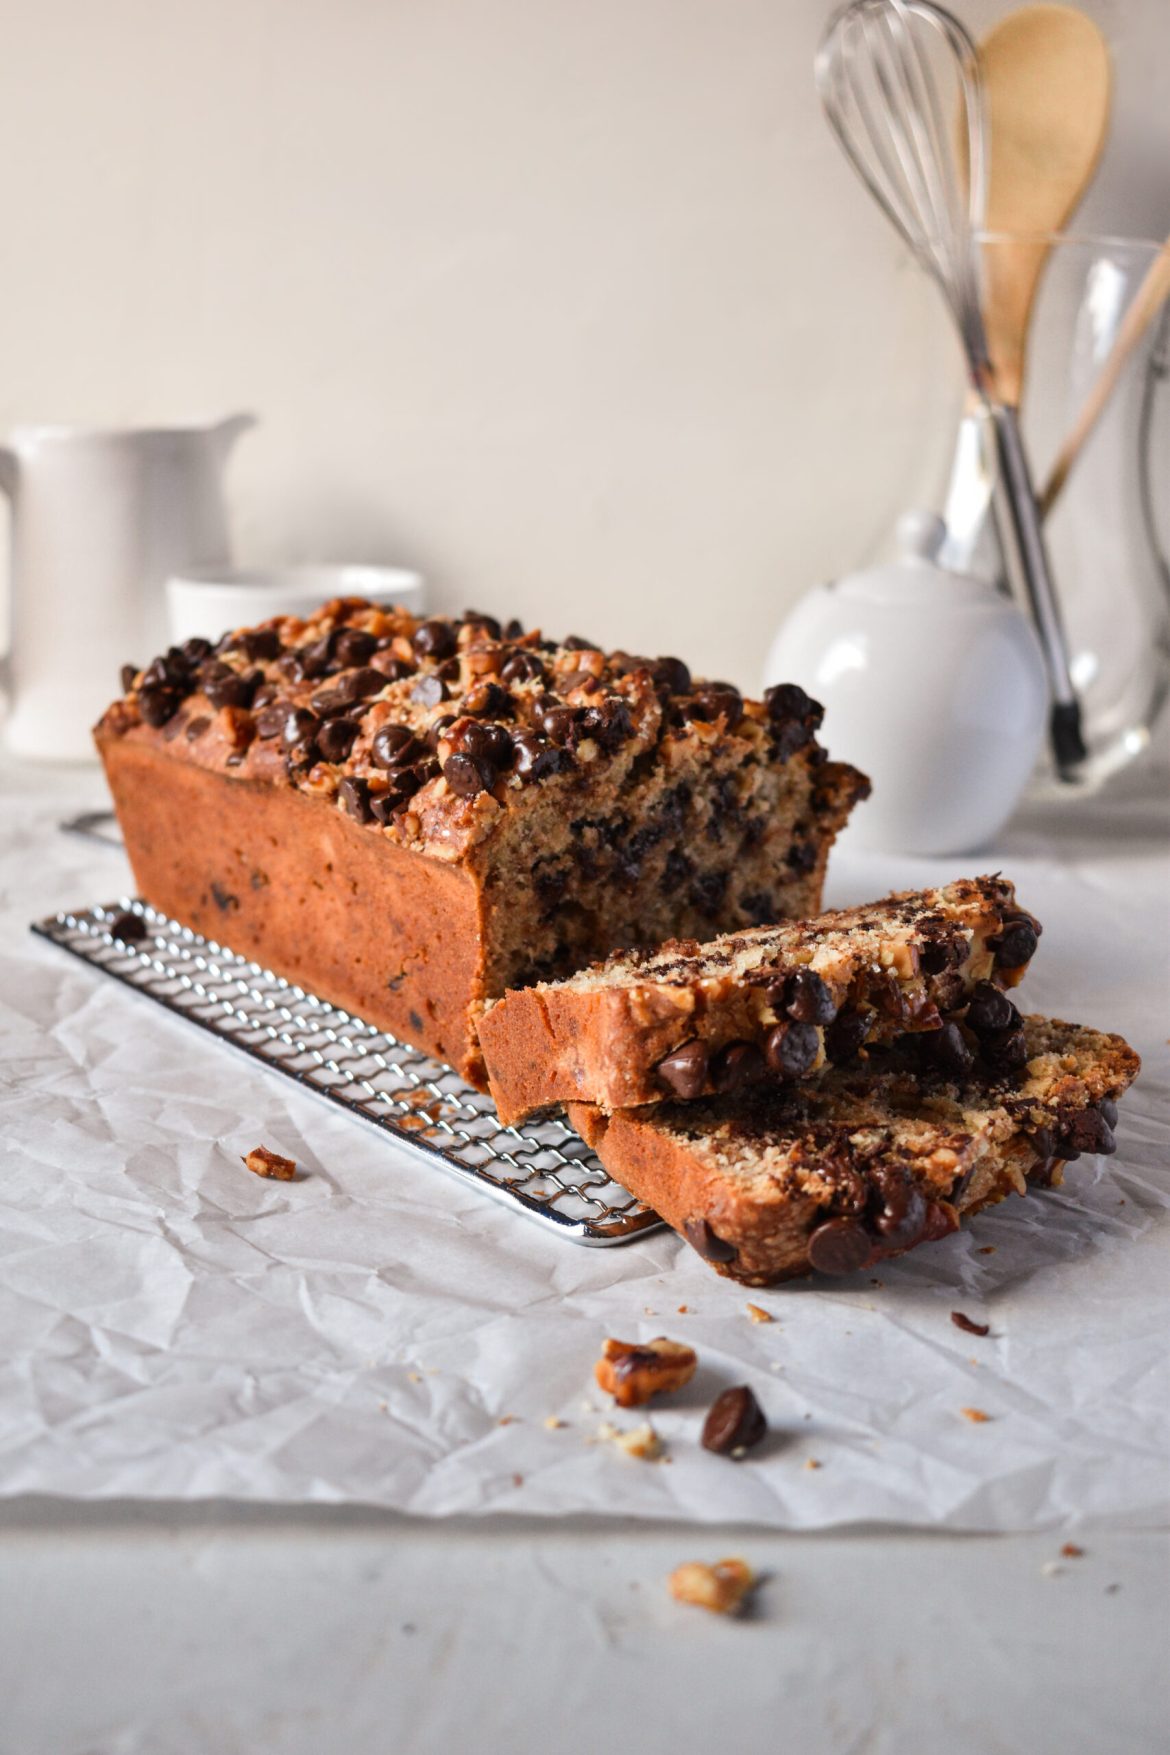
This easy chocolate chip banana bread recipe is tender, sweet, moist and packed with chocolate chips and crunchy walnuts, this is what banana bread dreams are made of! Not only is this recipe super easy, but it can be made in one bowl using ingredients you probably already have in your house. A special little trick I like to do is top the bread loaf with more chocolate, nuts and sugar for a crisp, flavorful topping!

How ripe should bananas be for banana bread?

The more ripe the better, but whether there are only a couple or dark spots or the bananas are completely black this recipe will work! If I’m being honest I tend to buy extra bananas just so they overripen and I can make more banana bread! The reason we want overripe bananas is because they are very sweet and super soft which makes the bread tender, moist and sweet.

Ingredient Notes

The ingredients that go into this easy chocolate chip banana bread recipe

Bananas – what would banana bread be without bananas?!

Eggs – binds the bread together and provides some much needed moisture

Melted Butter – provides moisture and fat, while also softening the bread

Caster Sugar – of course! To sweeten the bread

Plain Flour – provides the perfect base to create a tender, moist banana bread

Baking Powder – adds so much lightness and height to the banana bread

Salt – balances everything out and enhances all of the flavours

Vanilla Paste or Vanilla Extract – adds so much flavour, depth and that classic vanilla smell

Espresso powder / Instant coffee – adds a ton of flavour and richness, without being overpowering

Chocolate Chips – I like using semi-sweet chocolate chips but, you could use milk, dark or even a mix or the two!

Walnuts – adds a nutty flavour and crunchy texture, that sends this recipe over the top! – You could substitute with pecans, if you wish

Granulated sugar – for a crisp and sweet top to the banana bread

What is the difference between banana bread and banana cake? 

They are very similar in taste and consistency except banana bread doesn’t often have icing or frosting like banana cake does. Banana bread also tends to have more texture and isn’t as smooth as banana cake. Think of it like the difference between a cupcake and a muffin, very similar in texture but completely different in eating experience.

How to make chocolate chip banana bread  – step by step

  1. Mash the bananas with a fork or whisk, till mostly smooth
  2. Then, crack in the eggs one at a time and whisk together well for a few minutes
  3. Next, add in the sugar and melted butter and combine
  4. Now, add in the salt, vanilla and coffee powder and mix
  5. Sift in the plain flour and baking powder, mix well to combine (but do not overmix!)
  6. Coat the chocolate chips and chopped walnuts in 1 tbsp of flour and fold into the banana bread mixture
  7. Pour the banana bread batter in a prepared loaf pan and top with some extra chocolate chips, walnuts and a sprinkle of sugar for that extra crisp top
  8. Place in a preheated oven at (180°C / 355°F / gas mark 4) and bake for 40 – 50 minutes until the top is golden and a toothpick comes out clean 

Note: the top of the banana bread often browns before the inside is fully cooked, so once the top has browned cover the loaf pan in a sheet of foil, until fully cooked in the centre

  1. When the banana bread is done cooking, take it out onto a cooling rack
  2. Once fully cooled, slice and serve!

Do I need to add walnuts to the banana bread? 

No, of course not, not if you don’t want to. You can leave them out completely or replace them with pecans, they are just as flavourful and crunchy.

What kind of chocolate should I use for chocolate chip banana bread?

My chocolate of choice is semi-sweet chocolate chips, as they are well balanced, full of chocolate flavour and still nice and sweet. But you can use milk chocolate chips for an even sweeter banana bread or dark chocolate chips for a richer and darker flavour! You could even mix even quantities or milk and dark chocolate chips together, this creates a wonderful balanced chocolate flavour with a lot of depth.

Tips and Tricks – Easy Chocolate Chip Banana Bread Recipe

  • Use foil –  to cover the top of the banana bread, especially if you’re making this in a loaf tin as, the top tends to brown before the inside is fully cooked
  • Store the chocolate chip banana bread – in a airtight container or tin and store at room temperature at it should last for about 3 days
  • If you don’t have overripe bananas – use can use ripe yellow bananas and add in a little more sugar
  • If you don’t like walnuts – simply leave them out or replace them with pecans instead
  • To mash the bananas – use a fork, a potato masher or even a metal whisk

The recipe video is on my Tik Tok and IG  – please tag @aceofspoons_ if you make this recipe

Easy Chocolate Chip Banana Bread Recipe

This easy chocolate chip banana bread recipe is tender, sweet, moist and packed with chocolate chips and crunchy walnuts, this is what banana bread dreams are made of!
Print Recipe Pin Recipe
Prep Time 15 minutes mins
Cook Time 50 minutes mins
Total Time 1 hour hr 5 minutes mins
Course Breakfast, Brunch, Dessert
Servings 16 servings

Equipment

  • Loaf pan
  • Mixing bowl
  • Whisk

Ingredients
  

  • 2 bananas
  • 2 eggs
  • 150 g melted butter 2/3 cups
  • 200 g caster sugar 1 cup
  • 150 g plain flour 1 1/4 cups
  • 1/2 tsp salt
  • 1/2 tsp espresso powder (or 1/2 tsp instant coffee diluted)
  • 2 tsp vanilla extract
  • 1 tsp baking powder
  • 1 cup chocolate chips 170g
  • 1/2 cup chopped walnuts 60g
  • 1 tbsp plain flour (to coat the chocolate chips and walnuts in)

Banana Bread Topping

  • extra chocolate chips
  • extra chopped walnuts
  • 1 tbsp granulated sugar

Instructions
 

  • Preheat on oven at (180°C / 355°F / gas mark 4)
  • Mash the bananas with a fork or whisk, till mostly smooth
  • Then, crack in the eggs one at a time and whisk together well for a few minutes
  • Next, add in the sugar and melted butter and combine
  • Now, add in the salt, vanilla and espresso powder (or instant coffee) and mix
  • Sift in the plain flour and baking powder, mix well to combine (but do not overmix!)
  • Coat the chocolate chips and chopped walnuts in 1 tbsp of flour and fold into the banana bread mixture
  • Pour the banana bread batter in a prepared loaf pan and top with some extra chocolate chips, walnuts and a sprinkle of granulated sugar for that extra crisp top
  • Bake for 40 – 50 minutes until the top is golden and a toothpick comes out clean
    Note: the top of the banana bread often browns before the inside is fully cooked, so once the top has browned cover the loaf pan in a sheet of foil, until fully cooked in the centre
  • When the banana bread is done cooking, take it out onto a cooling rack, slice and serve!

Notes

  • Use foil –  to cover the top of the banana bread, especially if you’re making this in a loaf tin as, the top tends to brown before the inside is fully cooked
  • Store the chocolate chip banana bread – in a airtight container or tin and store at room temperature at it should last for about 3 days
  • If you don’t have overripe bananas – use can use ripe yellow bananas and add in a little more sugar
  • If you don’t like walnuts – simply leave them out or replace them with pecans instead
  • To mash the bananas – use a fork, a potato masher or even a metal whisk
Keyword Banana, Chocolate
6th November 2022 0 comments
0 FacebookTwitterPinterestPocketEmail
BreakfastDough and Pastries

Easy Pumpkin Spice Almond Croissant Recipe

by Hunar Baig 4th November 2022
written by Hunar Baig

Easy Pumpkin Spice Almond Croissant Recipe

These easy pumpkin spice almond croissants are a festive fall take on an old classic! They are so simple and incredibly delicious, they are a trip to an autumnal Paris, in a pastry and the PERFECT treat for a weekend morning, or really any morning. A flaky croissant, filled with a sweet pumpkin spiced, almond and vanilla paste, crisp on the outside and soft in the middle and topped with more almonds and a final flourishing of icing sugar!

What is an almond croissant made of?

Almond croissants are made with day-old (or older) stale croissants and filled with a paste that is primarily made with ground almonds, butter, sugar, eggs, flour and some vanilla and almond extract. The croissants are also coated in simple syrup before they are baked and voila, almond croissants!

Ingredient Notes

The ingredients that go into this easy pumpkin spice almond croissant recipe

Croissants – of course! We need croissants to make pumpkin spice almond croissants and in this case the more stale the better

Butter – adds so much moisture, fat and flavour

Sugar – provides sweetness and makes the croissants softer

Pumpkin Puree – binds the croissant filling together, adds so much pumpkin flavour and that fabulous orange colour 

Ground Almonds / Almonds Meal – provides so much texture and nutty almond flavour

Flour – adds more density and body to the filling

Vanilla Paste or Extract – adds so much flavour, depth and that classic vanilla smell

Pumpkin Spice – of course! For that classic pumpkin spice flavour and it makes your whole house smell like fall

Almond Paste or Extract – is key to get that classic bakery style almond croissant flavour and works so well with the pumpkin spice flavour

Salt – balances everything out and enhances all of the flavours

Slivered / Flaked Almonds – goes crisp in the oven, adds so much flavour and makes the croissants so pretty!

Water – to make the simple syrup

Icing Sugar – to make the croissants beautiful and add a little more sweetness

Baking with pumpkin puree:

Pumpkin puree can have a lot of added water which can be fine for cakes or breads, but isn’t ideal for baked goods like cookies, brownies, or pastries. The added water can make the bake take longer to cook and make everything a little more cakey and fluffy. 

Here is how you combat that:

  1. Blot the pumpkin puree – Place a couple of kitchen towels (paper towels) into a bowl, then add in your pumpkin puree, fold the sides of the towels over top and press gently. The towels will soak up the excess water.
  2. Drain the pumpkin puree – Using a muslin cloth or a couple of paper towels, (the paper towels will break very easily, but they are still effective) place the pumpkin puree inside and wring out the excess water. Wringing out your pumpkin will help to preserve the texture of the baked good and keep it from getting too cakey!

Keep in mind that the pumpkin doesn’t need to be bone dry, just the extra water needs to be removed.

How to make Pumpkin Spice Almond Croissants – step by step

  1. Make the syrup by boiling together the sugar and water in a saucepan until, all the sugar completely dissolves, then take off the heat and add in vanilla extract and almond paste (extract) 
  2. Whisk together the soften butter and sugar till light and fluffy
  3. Use some paper towels or a muslin cloth to drain some of the liquid from the pumpkin puree, before adding it into the filling and giving it a good mix. Making sure there are no lumps
  4. Add in the pumpkin spice, vanilla, almond paste or extract, ground almonds, salt and flour and mix to fully combine
  5. Slice open the croissants and place onto a lined baking tray, cut sides up
  6. Brush the cut sides of the croissants generously with the syrup
  7. Pipe or spread the pumpkin spice almond filling into the croissants and place on the croissant tops
  8. Coat the top of the croissants with the almond syrup using a pastry brush
  9. Pipe on some more filling and press on lots of flaked almonds
  10. Place in a preheated oven at (180°C / 355°F / gas mark 4) and bake for 12 – 15 minutes until the croissants are golden brown
  11. Once baked, sift on some icing sugar and enjoy!

How do you reheat pumpkin spice almond croissants:

I honestly love day old pumpkin spice almond croissants at room temp but, if you want to reheat them here’s how: Place the croissants onto a lined baking tray and place into a preheated oven at (180°C / 360°F / gas mark 4) for about 5 minutes (around 10 mins if they are frozen), making sure to keep a close eye on them as they can very easily burn. Another method would be to use a microwave they won’t be as crisp but they will be warm


NOTE: If you plan to reheat or freeze your croissants don’t top with icing sugar when they first bake, you can add some once they have reheated.

How should you store the pumpkin spice almond croissants? 

These easy pumpkin spice almond croissants are best hot out of the oven, and they stay fresh, buttery, and flaky for up to 3 days, if stored in an airtight container or plastic bag. Or a week if stored in an airtight container in the fridge.

How long do pumpkin spice almond croissants last?

Around 3 days at room temp in an airtight container or plastic bag, a week in the fridge, also in an airtight container or plastic bag and around 3 months in the freezer, in a freezer safe container or plastic bag, if frozen correctly.

Can you freeze these pumpkin spice almond croissants?

Yes! You can freeze them and pop them into the oven for fresh pumpkin spice almond croissants anytime of the year. To freeze, make sure to let the croissants get to room temperature and don’t add any icing sugar on top. Then, simply place them into a freezer safe container or plastic bag and they should last around 3 months.

Can you make pumpkin spice almond croissants without stale croissants?

Yes! Simply slice open the croissants and let them sit out to dry, cut sides up, for 15 minutes and then make the rest of the recipe as instructed. (You can leave them out to dry while you make the syrup and the filling!)

Tips and Tricks – Easy Pumpkin Spice Almond Croissant Recipe

  • MAKE SURE – you are using pumpkin puree and NOT pumpkin pie filling
  • Drain, blot or wring out – the pumpkin puree to remove the extra water, this will ensure that the croissants aren’t soggy!
  • Use parchment paper –  to line the trays, this will make cleanup easier and ensure that croissants won’t stick
  • Store the pumpkin spice almond croissants – in a airtight container or plastic bag and store at room temperature, they should last for about 3 days
  • If you don’t have stale croissants – simply slice them open and place them cut side up to dry out for 15 minutes
  • If you don’t like that strong almond flavour – simply add less almond extract / paste, or you could even leave it out!
  • To fill the croissants – use a piping bag, a food bag, or simply the back of a spoon the spread out the mixture


The recipe video is on my Tik Tok and IG  â€“ please tag me @aceofspoons_ if you make this recipe

Easy Pumpkin Spice Almond Croissant Recipe

Hunar Baig
Flaky croissants, filled with a sweet pumpkin spiced, almond and vanilla paste, crisp on the outside and soft in the middle and topped with more almonds and a final flourishing of icing sugar!
Print Recipe Pin Recipe
Prep Time 15 minutes mins
Cook Time 15 minutes mins
Total Time 30 minutes mins
Course Breakfast, Brunch
Cuisine French
Servings 8 croissants

Equipment

  • Baking trays
  • Pastry brush
  • Piping bag or food bag optional

Ingredients
  

  • 8 Croissants
  • Flaked almonds
  • Icing sugar

Croissant Syrup

  • 100 g caster sugar 1/2 cup
  • 125 ml water 1/2 cup
  • 1 tsp vanilla extract
  • 1 tsp almond extract (1/2 tsp almond paste)

Croissant Filling

  • 115 g softened butter 1/2 cup
  • 100 g caster sugar 1/2 cup
  • 115 g pumpkin puree 1/2 cup
  • 1 tsp vanilla extract
  • 2 tsp almond extract (1 tsp almond paste)
  • 1 tsp pumpkin pie spice
  • 1/4 tsp salt
  • 100 g ground almonds / almond meal 1 cup
  • 25 g plain flour 2 tbsp

Instructions
 

Pumpkin Spice Croissant Syrup

  • Make the syrup by boiling together the sugar and water in a saucepan until, all the sugar completely dissolves
  • Then take off the heat and add in vanilla extract and almond paste and stir

Pumpkin Spice Croissant Filling

  • Whisk together the soften butter and sugar till light and fluffy
  • Use some paper towels or a muslin cloth to drain some of the liquid from the pumpkin puree, before adding it into the filling and giving it a good mix. Making sure there are no lumps
  • Add in the pumpkin spice, vanilla, almond paste or extract, ground almonds, salt and flour and mix to fully combine
    (Place into a piping bag if using one)

Making the Pumpkin Spice Almond Croissants

  • Preheat an oven at (180°C / 360°F / gas mark 4)
  • Slice open the croissants and place onto a lined baking tray
  • Brush the cut sides of the croissants generously with the syrup
  • Pipe or spread the pumpkin filling into the croissants and place on the croissant tops
  • Coat the top of the croissants with the almond syrup using a pastry brush
  • Pipe on some more pumpkin filling and press on lots of flaked almonds and bake for 12 – 15 minutes until the croissants are golden brown
  • Once baked, sift on some icing sugar and enjoy!

Notes

  • MAKE SURE – you are using pumpkin puree and NOT pumpkin pie filling
  • Drain, blot or wring out – the pumpkin puree to remove the extra water, this will ensure that the croissants aren’t soggy!
  • Use parchment paper –  to line the trays, this will make cleanup easier and ensure that croissants won’t stick
  • Store the pumpkin spice almond croissants – in a airtight container or plastic bag and store at room temperature, they should last for about 3 days
  • If you don’t have stale croissants – simply slice them open and place them cut side up to dry out for 15 minutes
  • If you don’t like that strong almond flavour – simply add less almond extract / paste, or you could even leave it out!
  • To fill the croissants – use a piping bag, a food bag, or simply the back of a spoon the spread out the mixture
Keyword Croissants, Pumpkin
4th November 2022 1 comment
0 FacebookTwitterPinterestPocketEmail
ChickenQuick dishes

The BEST Tandoori Chicken Skewers Recipe

by Hunar Baig 6th October 2022
written by Hunar Baig

Tandoori Chicken Skewers Recipe

These tandoori chicken skewers are full of flavour, perfectly tender and so easy to whip up. The flavours and ingredients aren’t what you’d find in a traditional chicken tandoori recipe, this recipe is not as spicy and focuses more on creating a flavour that is rich, spiced and balanced. So, in that I guess you could say that this is a tandoori inspired recipe!

What is Tandoori Chicken? 

Tandoori chicken gets its name from tandoor which is a cylindrical clay oven that the chicken is typically roasted in. It originates from south asia and the marinade is typically yoghurt based, as this helps the chicken tenderise. Normally, tandoori chicken is made with whole chicken or chicken legs but, for this easy at home version we are using chicken breast.

The primary ingredients in tandoori chicken marinade is:

  • Yoghurt 
  • Salt + Spices
  • Fresh ginger
  • Fresh Garlic
  • Lemon juice
  • And sometimes red food colour

A Personal note about these tandoori chicken skewers… 

I’m a British Pakistani and this is my take on tandoori chicken, a version I love to make regularly for my friends and family and a version I feel brings my love of Pakistani cuisine  and the mix of cultures and heritage in British food together. From using Worcestershire sauce, to maple syrup and red chilli powder, this tandoori recipe is a new take on an old classic.

Ingredient Notes

The ingredients that go into these easy and delicious tandoori chicken skewers

Chicken Breast – skinless and cut into cubes. You could even replace the chicken breast with boneless, skinless, cubed chicken thighs.

Wet Ingredients

Garlic & Ginger – adds so much flavour and freshness

Yoghurt – provides moisture, while also tendersing the chicken

Oil – adds some fat

Ketchup – adds a sweet, sticky and smoky flavour

Lemon Juice  – is used to tenderise the chicken

Vinegar – balances everything out the flavours and softens the chicken

Maple Syrup – adds depth, smokiness and sweetness – you can replace this with sugar, if you’d like

Worcestershire Sauce – adds so much depth and a super savoury flavour

Dry Ingredients

Salt – balances everything out and enhances all of the flavours

Black & White Pepper – for a ton of peppery flavour

Red Chilli Powder – adds spice and a red hue of colour 

Whole Cumin – adds so much texture and flavour 

Ground Cumin & Coriander – adds such a great base of flavour

Turmeric  – for some colour 

Garlic Powder – adds more garlic flavour

Smoked Paprika (optional) – adds so much colour and warmth

How to make Tandoori Chicken Skewers – step by step (with pictures) 

  1. Mix together all of the marinade ingredients together and mix it with the chicken breast
  2. Store the chicken in the fridge and let it sit for at least 2 hrs or preferably overnight
  3. Soak some bamboo skewers in some warm water for 10 minutes before skewering on the chicken
  4. Skewer the chicken on to the skewers, before grilling
  5. Heat up a pan with some oil, (or you could use spray oil for a lower fat option) and brown the skewers on all sides
  6. Once browned, place on a lid and cook for 8 – 10 minutes, until the chicken is fully cooked and white in the middle
  7. Serve with naan, salad, chutney or rice and enjoy!

How to cook tandoori chicken skewers?

In a pan – this is my favourite method. SImply heat up a non-stick pan with some olive oil, or spray oil for a low fat option, seal off the skewers on a high heat on each side. Once browned, place on a lid and cook for 8 – 12 minutes, until the chicken is fully cooked and white in the middle

On a Grill – grill the tandoori chicken over medium-high heat 4-5 minutes on each side, turning occasionally until chicken registers 165F, about 8-10 minutes of cooking time total.


BBQ – these skewers are perfect for a barbeque and they cook up super quickly!

What should you serve with tandoori chicken?

These tandoori chicken skewers are full of flavour and go well with so many things, from bread, to rice, salad and everything in between. I like having a mix of a few different things, like a mezze of sorts.

Here are some of my favourites:

  • Garlic Naan
  • Rice or biryani
  • Pitta Bread
  • Yoghurt
  • Chips or Fries
  • Pickled red onions
  • Chutneys
  • Salad
  • Roast potatoes
  • and so many more…

Tips and Tricks – Tandoori Chicken Skewers Recipe

  • Soak the bamboo skewers – to make skewering the chicken easier and quicker
  • Reheat the chicken skewers – in a frying pan, on a low heat,  with a little water and a lid, for around 5 – 7 minutes
  • Use red food colouring – if you want that classic red colour, only a few drops will do the trick! 
  • If you don’t like chicken breast – simply use chicken thighs instead 
  • You can make these skewers low fat – by using spray oil to cook the skewers, instead of using oil in a pan
  • The recipe video is on my Tik Tok and IG  â€“ please tag @aceofspoons_ if you make this recipe

Tandoori Chicken Skewers

Hunar Baig
Print Recipe Pin Recipe
Prep Time 15 minutes mins
Cook Time 30 minutes mins
Total Time 45 minutes mins
Course Chicken, Main Course
Cuisine Desi, Indian, Pakistani
Servings 15 skewers

Equipment

  • Bamboo Skewers
  • Non-stick or Grill pan

Ingredients
  

  • 1 kg chicken breast cut into cubes
  • 5 cloves crushed garlic or 1 tbsp paste
  • a thumb sized piece of ginger crushed or 1 tbsp paste
  • 4 tbsp natural yogurt
  • 2 tbsp olive oil
  • 1 tsp salt
  • 1 tsp black pepper
  • 1 tsp red chilli powder
  • 1 tsp whole cumin
  • 1 tsp ground cumin
  • 1 tsp ground coriander
  • 1/4 tsp turmeric
  • 1/2 tsp ground white pepper
  • 1 tsp garlic granules or garlic powder (optional if you want more garlic flavour)
  • 1/2 tsp smoked paprika (optional, for more spice and color)
  • 1 tbsp lemon juice
  • 1 tbsp ketchup
  • 1 tbsp vinegar
  • 1 tbsp maple syrup or 1 tsp sugar
  • 1 tbsp Worcestershire sauce

Instructions
 

  • Mix together all of the marinade ingredients together and mix it with the chicken breast
  • Store the chicken in the fridge and let it sit for at least 2 hrs or preferably overnight
  • Soak some bamboo skewers in some warm water for 10 minutes before skewering on the chicken
  • Skewer the chicken on to the skewers, before grilling
  • Heat up a pan with some oil, (or you could use spray oil for a lower fat option) and brown the skewers on all sides
  • Once browned, place on a lid and cook for 8 – 10 minutes, until the chicken is fully cooked and white in the middle
  • Serve with naan, salad, chutney or rice and enjoy!

Notes

  • Soak the bamboo skewers – to make skewering the chicken easier and quicker
  • Reheat the chicken skewers – in a frying pan, on a low heat,  with a little water and a lid, for around 5 – 7 minutes
  • Use red food colouring – if you want that classic red colour, only a few drops will do the trick! 
  • If you don’t like chicken breast – simply use chicken thighs instead 
  • You can make these skewers low fat – by using spray oil to cook the skewers, instead of using oil in a pan
Keyword Chicken
6th October 2022 0 comments
0 FacebookTwitterPinterestPocketEmail
Baked goods & PastriesBreakfastDessertsDough and Pastries

Easy Bakery-Style Almond Croissants Recipe

by Hunar Baig 9th September 2022
written by Hunar Baig

Easy Bakery-Style Almond Croissants Recipe

These easy bakery style almond croissants are so simple and incredibly delicious, they are a trip to Paris within a pastry and the perfect treat for a weekend morning, or really any morning. A flaky croissant, filled with a sweet almond and vanilla paste, crisp on the outside and soft in the middle and topped with more almonds and a final flourishing of icing sugar!

What is an almond croissant made of?

Almond croissants are made with day-old (or older) stale croissants and filled with a paste that is primarily made with ground almonds, butter, sugar, eggs, flour and some vanilla and almond extract. The croissants are also coated in simple syrup before they are baked and voila, almond croissants!

Ingredient Notes

The ingredients that go into this easy bakery-style almond croissants

Croissants – of course! We need croissants to make almond croissants and in this case the more stale the better

Butter – adds so much moisture, fat and flavour

Sugar – provides sweetness and makes the croissants softer

Eggs – binds the almond mixture together

Ground Almonds / Almonds Meal – provides so much texture and nutty almond flavour

Vanilla Paste or Extract – adds so much flavour, depth and that classic vanilla smell

Almond Paste or Extract – is key to get that classic bakery style almond croissant flavour

Flour – adds more density and body to the filling

Salt – balances everything out and enhances all of the flavours

Slivered / Flaked Almonds – goes crisp in the oven, adds so much flavour and makes the croissants so pretty!

Water – to make the almond simple syrup with

Icing Sugar – to make the croissants beautiful and add a little more sweetness

How to make Bakery-Style Almond Croissants – step by step

  1. Make the syrup by boiling together the sugar and water in a saucepan until, all the sugar completely dissolves, then take off the heat and add in vanilla extract and almond paste
  2. Whisk together the soften butter and sugar till light and fluffy
  3. Crack in the egg and combine
  4. Before adding the vanilla, almond paste or extract, ground almonds, salt and flour and mix to fully combine
  5. Slice open the croissants and place onto a lined baking tray
  6. Brush the cut sides of the croissants generously with the syrup
  7. Pipe or spread the almond filling into the croissants and place on the croissant tops
  8. Coat the top of the croissants with the almond syrup using a pastry brush
  9. Pipe on some more almond filling and press on lots of flaked almonds
  10. Place in a preheated oven at (180°C / 360°F / gas mark 4) and bake for 12 – 15 minutes until the croissants are golden brown
  11. Once baked, sift on some icing sugar and enjoy!

How should you store almond croissants? 

These easy bakery-style almond croissants are best hot out of the oven, but they stay fresh, buttery, and flaky for up to 3 days stored in an airtight container or plastic bag. Or a week if stored in an airtight container in the fridge.

How long do almond croissants last?

Around 3 days at room temp in an airtight container or plastic bag, a week in the fridge, also in an airtight container or plastic bag and around 3 months in the freezer, in a freezer safe container or plastic bag, if frozen correctly.

Can you freeze almond croissants?

Yes! You can freeze them and pop them into the oven for fresh almond croissants anytime or the day or night. To freeze, make sure to let the croissants get to room temperature and don’t add any icing sugar on top. Then, simply place them into a freezer safe container or plastic bag and they should last around 3 months.

Can you make almond croissants without stale croissants?

Yes! Simply slice open the croissants and let them sit out to dry, cut sides up, for 15 minutes and then make the rest of the recipe as instructed. (You can leave them out to dry while you make the syrup and the filling!)

How do you reheat almond croissants:

I honestly love day old almond croissants at room temp but, if you want to reheat them here’s how: Place the croissants onto a lined baking tray and place into a preheated oven at (180°C / 360°F / gas mark 4) for about 5 minutes (around 10 mins if they are frozen), making sure to keep a close eye on them as they can very easily burn. Another method would be to use a microwave they won’t be as crisp but they will be warm


NOTE: If you plan to reheat or freeze your croissants don’t top with icing sugar when they first bake, you can add some once they have reheated.

Tips and Tricks – Easy Bakery-Style Almond Croissants Recipe

  • Use parchment paper –  to line the trays, this will make cleanup easier and ensure that croissants won’t stick
  • Store the almond croissants – in a airtight container or plastic bag and store at room temperature, they should last for about 3 days
  • If you don’t have stale croissants – simply slice them open and place them cut side up to dry out for 15 minutes
  • If you don’t like that strong almond flavour – simply add less almond extract / paste, or you could even leave it out!
  • To fill the croissants – use a piping bag, a food bag, or simply the back of a spoon the spread out the mixture
  • The recipe video is on my Tik Tok and IG  â€“ please tag @aceofspoons_ if you make this recipe

Almond Croissants

Crisp, flaky, buttery almond croissants that are absolutely delicious and a cinch to make!
Print Recipe Pin Recipe
Prep Time 15 minutes mins
Cook Time 15 minutes mins
Total Time 30 minutes mins
Course Breakfast, Brunch
Cuisine French
Servings 8 Croissants

Equipment

  • Pastry brush
  • Piping bag or a spoon
  • Baking trays

Ingredients
  

  • 8 Croissants
  • Flaked Almonds
  • Icing Sugar

Almond Syrup

  • 100 g caster sugar 1/2 cup
  • 125 ml water 1/2 cup
  • 1 tsp vanilla extract
  • 1 tsp almond extract (1/2 tsp almond paste)

Almond Croissant Filling

  • 115 g softened butter 1/2 cup
  • 100 g caster sugar 1/2 cup
  • 1 egg
  • 1 tsp vanilla paste or extract
  • 2 tsp almond extract (1 tsp almond paste)
  • 1/4 tsp salt
  • 100 g ground almonds / almond meal 1 cup
  • 25 g plain flour 2 tbsp

Instructions
 

Almond Syrup

  • Make the syrup by boiling together the sugar and water in a saucepan until, all the sugar completely dissolves
  • Then take off the heat and add in vanilla extract and almond paste and stir

Almond Croissant Filling

  • Whisk together the soften butter and sugar till light and fluffy
  • Crack in the egg and combine
  • Before adding the vanilla, almond paste or extract, ground almonds, salt and flour and mix to fully combine
    (Place into a piping bag if using one)

Making the Almond Croissants

  • Preheat an oven at (180°C / 360°F / gas mark 4)
  • Slice open the croissants and place onto a lined baking tray
  • Brush the cut sides of the croissants generously with the syrup
  • Pipe or spread the almond filling into the croissants and place on the croissant tops
  • Coat the top of the croissants with the almond syrup using a pastry brush
  • Pipe on some more almond filling and press on lots of flaked almonds and bake for 12 – 15 minutes until the croissants are golden brown
  • Once baked, sift on some icing sugar and enjoy!

Notes

  • Any left over syrup is great in an iced coffee!
  • Use parchment paper – to line the trays, this will make clean-up easier and ensure that croissants won’t stick
  • Store the almond croissants – in a airtight container or plastic bag and store at room temperature, they should last for about 3 days
  • If you don’t have stale croissants – simply slice them open and place them cut side up to dry out for 15 minutes
  • If you don’t like that strong almond flavour – simply add less almond extract / paste, or you could even leave it out!
Keyword Croissants, Pastry
9th September 2022 0 comments
0 FacebookTwitterPinterestPocketEmail
BreadComfort foodDough and Pastries

The BEST Garlic Naan Recipe

by Hunar Baig 9th September 2022
written by Hunar Baig

Garlic Naan Recipe

This garlic naan recipe is soft, buttery, delicious and truly addictive. If you’ve ever been intimidated to make bread this is the recipe for you as it is so easy! These go well with so many dishes from chickpea curry, to butter chicken and chicken karahi, the list is endless!

What is Naan? 

Naan is a leavened flatbread, baked in an oven, a tandoori or on a tawa (pan) and typically served with curries & karahi dishes. Originally found in the cuisines mainly of Western Asia, Central Asia, Indian subcontinent, Indonesia, Malaysia, Myanmar, and the Caribbean.

The primary ingredients in naan are:

  • Flour
  • Yeast
  • Salt
  • Sugar
  • Water
  • And sometimes yogurt or oil

What is Garlic Naan?

Naan is soft, buttery and slightly crisp on the edges. Garlic naan has so much more flavour than regular naan and is covered with a garlic and herb butter.

Ingredient Notes

The ingredients that go into these buttery and delicious garlic naan

00 flour – is the best flour to create, soft, fluffy and light naan

Dried Yeast – to leaven the dough and add height

Salt – will add more flavour

Sugar – will help the yeast bloom

Melted Butter – adds moisture and softness to the dough

Warm Water – to active the yeast in

Garlic Butter Ingredients

Softened Butter  – will melt on the hot naan and be the base for the garlic butter

Fresh Garlic – of course! We need garlic for garlic naan!

Fresh Parsley or Coriander – provides some colour and a ton of flavour. I like using parsley, as I really like the combination of garlic and parsley, however coriander is traditional and works really well!  

Flaky Salt (you can skip if using salted butter) – adds more flavour and enhances the flavour of the garlic.

How to make The BEST Garlic Naan Recipe – step by step 

1. Start by blooming the yeast, mix the warm water and sugar until the sugar has dissolved, then add in the yeast and mix. Cover the yeast mixture with a plate or some cling film (saran wrap) and let it bloom for 15 – 20 minutes.

2. Mix together the flour, salt and baking powder

3. Pour in the yeast mixture and knead the dough together until smooth. The dough will be a little sticky but keep kneading it and it will come together. (This would be easier in a stand mixer)

4. Add in the melted butter and knead, the dough will be slightly greasy on the outside. Place cling film (saran wrap) onto the bowl and a cloth on top to block out the light

5. Leave the dough to proof for an hour, until doubled in size and punch out the air

6. Divide the dough into 8 even balls

7. Prep the garlic butter by, finally chopping the garlic and herbs. Before combining with softened butter and salt, if desired 

8. Roll out one ball of dough at a time, into a circle or an oval

9. Heat up a non stick or cast iron pan on a high heat

10. Now, add in the naan and cook on a medium – high heat for about 1 – 2 minutes on each side

11. Once golden browned and fully cooked, take out into a basket or a plate 

12. Then brush with the garlic butter, serve and enjoy!

Best tips and tricks for making Garlic Naan:

  • Cook on a high heat – Cook the naan on a medium high heat, in a hot pan. This will  make the naan puff up and rise quickly
  • Use a non stick pan – this will make the naan closer to a tandoori naan, as naan is not traditionally fried so, this creates a crisp edge that isn’t too oily
  • Let your dough proof in a warm space – cover the dough in cling film (saran wrap) and place on a cloth to block out the light and then place in a warm place
  • When reheating – add a splash of water to the naan and heat in a pan, on a medium heat for 1 minute on each side
  • Use a stand mixer – This dough is quite sticky and a lot easier to make in a stand mixer, though you can knead this with your hands if you’d like!

What goes well with garlic naan? 

  • Butter Chicken is a classic to serve with garlic naan and is the perfect thing to scoop up all of the gravy from the butter chicken
  • Chicken karahi is a must with garlic naan, the peppery karahi works so well with the buttery naan
  • Nihari is a stewed beef dish from Pakistan that is perfect served with garlic naan

Why are we using 00 flour?

Traditionally 00 flour is used for pizza or pasta to create a soft and tender dough that still has a slight chew and that is exactly why it is used in this naan recipe. 00 flour gives you a texture closer to a tandoori naan, without the tandoori, at home!

Replacement for 00 flour:

The best replacement for 00 flour is strong white bread flour, it is similar in consistency and will give you a slightly crisper and browner crust. But if you can find that all purpose flour will do the trick!

What is the best way to reheat garlic naan bread?

The first method is to put the naan on a plate in the microwave for 15 – 30 seconds, or until warmed through. The naan won’t be as crisp but it will still be delicious.

The second method is to put a little warm water on the naan and heat it in a non-stick or cast iron pan on medium heat for about a minute on each side.

The last method is to wrap multiple naan into foil and place on a tray and pop it into the oven at (180°C / 350°F / gas mark 4), until warmed through, for about 10 minutes.

What pan should you cook garlic naan in?

Either a cast iron or non-stick one. Now, personally I like a non-stick or cast iron pan with no oil as it is more similar to a traditional tandoori naan. But, if you like restaurant style naan then use a cast iron pan with some oil, spraying or lightly coating the pan with oil, with each addition of naan.

Tips and Tricks – Garlic Naan Recipe

  • Cook on a high heat – Cook the naan on a medium high heat, in a hot pan. This will  make the naan puff up and rise quickly
  • Use a non stick pan – this will make the naan closer to a tandoori naan, as naan is not traditionally fried so, this creates a crisp edge that isn’t too oily
  • Let your dough proof in a warm space – cover the dough in cling film (saran wrap) and place on a cloth to block out the light and then place in a warm place
  • When reheating – add a splash of water to the naan and heat in a pan, on a medium heat for 1 minute on each side
  • Use a stand mixer – This dough is quite sticky and a lot easier to make in a stand mixer, though you can knead this with your hands if you’d like!
  • Serve with – your favourite curries and a side of salad and yogurt
  • The recipe video is on my Tik Tok and IG  â€“ please tag @aceofspoons_ if you make this recipe

Garlic Naan

Soft, buttery and delicious garlic naan, that are so easy to make!
Print Recipe Pin Recipe
Prep Time 30 minutes mins
Cook Time 30 minutes mins
Proofing Time 1 hour hr
Total Time 2 hours hrs
Course Bread, Side Dish
Cuisine Desi
Servings 8 Garlic Naans

Equipment

  • Rolling Pin
  • Cast iron or non stick pan
  • Pastry brush

Ingredients
  

Naan Ingredients

  • 500 g 00 flour 4 cups
  • 7 g dried active yeast (1 packet)
  • 2 tsp sugar
  • 1 tsp salt
  • 360 ml warm water
  • 2 tsp baking powder
  • 50 g melted butter (1/4 cup)

Garlic Butter

  • 115 g softened butter (1/2 cup)
  • 3 – 5 cloves fresh garlic (depends on personal preference)
  • small bunch fresh parsley or coriander
  • flaky sea salt (optional)

Instructions
 

  • Start by blooming the yeast, mix the warm water and sugar until the sugar has dissolved, then add in the yeast and mix. Cover the yeast mixture with a plate or some cling film (saran wrap) and let it bloom for 15 – 20 minutes.
  • Mix together the flour, salt and baking powder
  • Pour in the yeast mixture and knead the dough together until smooth. The dough will be a little sticky but keep kneading it and it will come together. (This would be easier in a stand mixer)
  • Add in the melted butter and knead, the dough will be slightly greasy on the outside. Place cling film (saran wrap) onto the bowl and a cloth on top to block out the light
  • Leave the dough to proof for an hour, until doubled in size and punch out the air
  • Divide the dough into 8 even balls
  • Prep the garlic butter by, finally chopping the garlic and herbs. Before combining with softened butter and salt, if desired
  • Roll out one ball of dough at a time, into a circle or an oval
  • Heat up a non stick or cast iron pan on a high heat
  • Now, add in the naan and cook on a medium – high heat for about 1 – 2 minutes on each side
  • Once golden browned and fully cooked, take out into a basket or a plate
  • Then brush with the garlic butter, serve and enjoy!

Notes

  • Cook on a high heat – Cook the naan on a medium high heat, in a hot pan. This will  make the naan puff up and rise quickly
  • Use a non stick pan – this will make the naan closer to a tandoori naan, as naan is not traditionally fried so, this creates a crisp edge that isn’t too oily
  • Let your dough proof in a warm space – cover the dough in cling film (saran wrap) and place on a cloth to block out the light and then place in a warm place
  • When reheating – add a splash of water to the naan and heat in a pan, on a medium heat for 1 minute on each side
  • Use a stand mixer – This dough is quite sticky and a lot easier to make in a stand mixer, though you can knead this with your hands if you’d like!
  • Serve with – your favourite curries and a side of salad and yogurt
Keyword Garlic, Naan
9th September 2022 0 comments
0 FacebookTwitterPinterestPocketEmail
Baked goods & PastriesDessertsDough and PastriesUncategorised

The Only Old Fashioned Doughnuts Recipe You’ll Ever Need

by Hunar Baig 8th August 2022
written by Hunar Baig

Old Fashioned Doughnuts Recipe

These old fashioned doughnuts are light and tender, with a crisp edge, covered in a sweet, shiny vanilla glaze, just like doughnuts from your favourite bakery. There is no yeast or cake flour in this recipe, making this recipe quicker and easier!

What is an old fashioned doughnut? 

Old fashioned doughnuts are slightly crisp, moist doughnuts, with a crackly top and jagged edges. These doughnuts do not contain any yeast and the main leaveners are baking powder or baking soda. It is believed they originated from the US around the 1830s and that it was based off of the classic cake doughnut. They are similar to cake doughnuts, only they are fried which makes them crisper and they have more leavening agents which makes them lighter.

The primary ingredients in the old-fashioned doughnuts are:

  • Flour
  • Sugar
  • Egg Yolks
  • Sour cream or Buttermilk
  • Butter
  • Leavener

Do I need cake flour or plain flour to make old fashioned doughnuts? 

Normally cake flour is used to make old-fashioned doughnuts, but this recipe uses plain flour and corn flour sifted together twice which creates the same tender, crisp and moist doughnuts, without the need for cake flour. Because honestly, I hardly have cake flour in my house and cake flour is far more expensive and I wanted to develop a doughnut recipe that is more accessible.

Ingredient Notes

The ingredients that go into these delightful old fashioned doughnuts

Plain Flour & Cornflour – double sifted to provide the perfect base for these light & crisp old fashioned doughnuts

Baking Powder – adds so much lightness and height to the doughnuts

Egg Yolks – binds the doughnuts together and adds more lightness

Butter – provides moisture and fat, while also softening the doughnuts 

Caster Sugar – of course! To sweeten the doughnuts 

Sour Cream – makes the doughnuts to moist, soft and tender

Ground Cinnamon & Nutmeg  – is traditionally used for old fashioned doughnuts & they add so much flavour and warmth

Salt – balances everything out and enhances all of the flavours

Vanilla Paste or Vanilla Extract – adds so much flavour, depth and that classic vanilla smell – I prefer paste as it adds little flecks of vanilla seeds to the doughnuts, which are just gorgeous 

Vanilla Glaze Ingredients

Icing Sugar – is the base for this glaze and provides so much sweetness

Vanilla Paste or Vanilla Extract – duh! Vanilla Glaze needs vanilla and lots of it!

Golden syrup or Corn Syrup – makes the glaze stick better to the doughnuts and provides another element of sweetness

Salt – will balance the sweetness in the glaze

Milk – will help thin out the glaze and make it slightly creamier

How to make Old Fashioned Doughnuts – step by step (with pictures) 

1. Cream together the butter and sugar

2. Then, add in the egg yolks a whip for about 5 minutes, till it’s light yellow and fluffy

3. Next, add in the sour cream and whip for a further 5 minutes, this time, the mixture should be even paler and almost doubled in size

4. Now, fold in the spices, vanilla and salt. Being careful not to over mix!

5. For the dry ingredients, sift together the plain flour, cornflour and baking powder twice (It’s really important to double sift these together.)

6. Now, add in a cup of your flour mixture at a time, into the wet mixture, fold well each time, until all of the flour is gone and you are left with a sticky dough. (Make sure not to over mix at this stage,  just fold the dry mixture enough so that it is combined.)

7. The dough is now ready and should be slightly sticky, bring the dough together so that it is one big ball (You don’t need to knead it) and place into a bowl, covered in cling film / saran wrap and allow it to rest in the fridge for at least an hour

8. Once the dough has fully chilled, roll out the dough, on a floured surface, to ½ an inch in thickness and cut out the doughnuts. You can also roll up the scraps, refrigerate them for around 15 minutes and re-roll and cut out more doughnuts

9. Place your cut doughnuts into the fridge to chill

10. Make the vanilla glaze by combining, icing sugar, salt, vanilla, golden syrup / corn syrup and milk until you have a thin glaze that is solid in colour. It should be a light beige, almost white colour and be able to coat the back of a spoon and set this to the side.

11. Fill a heavy bottomed pan with 2L of oil and heat to 325°F

12. In the meantime, set up a cooling rack with either parchment paper or paper towels underneath, to take the doughnuts out onto. Next to that, place a plate with a couple of chopsticks or skewers and a slotted spoon, now you’re ready to fry.

13. Carefully slide in the donuts one at a time, careful not to overcrowd the pan, or they won’t fry properly. Frying only 3 – 4 at a time.

14. Fry for 2 minutes on either side, they should be very lightly golden on the outside and crackly on the top. Once fried, place them onto a cooling rack

15. Once the doughnuts are cool enough to handle, immerse them into the glaze and place on a cooling rack, (with some parchment paper underneath to catch any extra glaze) and the doughnuts are ready!

The dos and don’ts of frying doughnuts

What is the best oil for frying doughnuts?

The best oil for frying doughnuts is rapeseed or canola oil, they will crisp up the doughnuts, fry really well and they have a very light taste. Plus because of the high smoking point they won’t burn as easily and won’t overcook the doughnuts. But, any neutral oil that has a high smoking point, will work really well. 

Here are some of the best ones:

  • Canola oil
  • Rapeseed oil
  • Vegetable oil 
  • Sunflower oil

What temperature do you fry doughnuts?

The best temperature for frying doughnuts is 325°F, but the temperature varies as you fry. Heat the oil to 325°F, it will go up and down, as you fry, but just make sure to not let the oil go above 350°F.  It’s really important when frying doughnuts to use a food thermometer (I like clipping a candy thermometer to the side of the pan), this will allow you to be in control of the temperature and take out all of the guesswork.

Remember: the heat will vary slightly so don’t worry if it goes over 325°F, just make sure the temperature of the oil doesn’t go over 350°F.

How do you know when doughnuts are done frying?

The doughnuts are done when they float to the top, they are crackly on top and are lightly golden on both sides. The doughnuts require around 2 minutes of frying time on each side.

How to set yourself up for doughnut frying success:

Before you fry your doughnuts you will need to set up a frying station, this will allow this process to be as easy and enjoyable as possible. Now, depending on how your kitchen is set up, the formation of this will be different, but as long as you have a clean & clear surface near your pan you should be fine.

  1. Start by rolling out and cutting your doughnuts before, placing onto a tray and popping them into the fridge to firm up slightly, which will make them easier to fry 
  2. Pour 2L of oil into a heavy bottomed pan and attach a candy or food thermometer (here is the one I use) and allow it to heat to 325°F 

If you have a thermometer that doesn’t attach to your pan, then just keep it close by and frequently check on the oil, again, making sure to stay under 350°F.

  1. In the meanwhile, prepare a cooling rack by placing a piece of parchment paper or some paper towels underneath it to soak up the excess oil, as you remove the cooked doughnuts.
  2. Place the cooling rack on a surface close to the pan, close enough to the pan that you can easily remove the fried doughnuts and place them onto the cooling rack, but not close enough that the parchment paper / paper towel will catch on fire. Next to that, place a plate with two chopsticks or long skewers to turn the doughnuts and a slotted spoon to remove them. 
  3. Place the tray of cooled and cut doughnuts on a nearby surface.
  4. Prepare the glaze before frying and leave it to the side, you don’t need to glaze the doughnuts when they are piping hot but, these doughnuts are best glazed slightly warm and they taste incredible warm too!
  5. You are now ready to fry the old fashioned doughnuts with ease!

A Personal note about making doughnuts… 

I want to note that I know that making doughnuts from scratch seems complicated and daunting, but I promise that it’s not! This recipe has been triple tested and broken down into simple steps, with process shots included. So, take a deep breath and dive into this recipe because when you take a bite of a warm, soft, tender doughnut, with a crisp edge and sweet vanilla glaze that you made, with your own hands, it’s just THE BEST FEELING EVER!

Tips and Tricks – Old Fashioned Doughnuts

  • Use two chopsticks or long skewers to turn the doughnuts over as you fry them
  • Store the doughnuts in a airtight container or tin, once the glaze has fully set and store at room temperature at they should last for about 3 days
  • If you don’t have a rolling pin use can use a closed bottle of olive oil or wine instead
  • If you don’t like cinnamon  or nutmeg, simply leave it out, your doughnuts will be lighter and have a stronger vanilla flavour
  • To cut the doughnuts, use a doughnut cutter if you have one or, a cookie cutter or mug, with a small piping tip to cut out the centres
  • Finally, you can see a full recipe video on my Tik Tok or IG  – please tag @aceofspoons_ if you make this recipe

Old Fashioned Doughnuts

Hunar Baig
These old fashioned doughnuts are light and tender, with a crisp edge, covered in a sweet, shiny vanilla glaze, just like doughnuts from your favourite bakery!
Print Recipe Pin Recipe
Prep Time 30 minutes mins
Cook Time 30 minutes mins
Inactive Time 1 hour hr
Course Breakfast, Brunch, Dessert
Cuisine American
Servings 15 Doughnuts and holes

Equipment

  • Large Heavy bottomed Pan
  • Cookie or Doughnut Cutter
  • Candy or Food Thermometer
  • Chopsticks
  • Slotted Spoon

Ingredients
  

Doughnut Ingredients

  • 50 g butter 4 tbsp
  • 100 g caster sugar 1/2 cup
  • 3 egg yolks
  • 200 g sour cream
  • 2 tsp vanilla extract or 1 tsp vanilla paste
  • 1 tsp salt
  • 1/4 tsp cinnamon
  • 1/4 tsp nutmeg
  • 400 g plain flour 3 1/3 cups
  • 50 g cornflour 1/2 cup
  • 2 tsp baking powder
  • 2 L Oil for frying

Vanilla Glaze Ingredients

  • 500 g Icing sugar 4 cups
  • 1/4 tsp Salt
  • 2 tbsp Golden Syrup or Corn syrup
  • 1 tsp Vanilla
  • 50 ml Milk 1/4 cup (this amount can vary but add a little at a time, till you get the right consistency)

Instructions
 

Making the Dough

  • Cream together the butter and sugar
  • Then, add in the egg yolks a whip for about 5 minutes, till it’s light yellow and fluffy
  • Next, add in the sour cream and whip for a further 5 minutes, this time, the mixture should be even paler and almost doubled in size
  • Now, fold in the spices, vanilla and salt. Being careful not to over mix!
  • For the dry ingredients, sift together the plain flour, cornflour and baking powder twice (It’s really important to double sift these together.)
    Now, add in a cup of your flour mixture at a time, into the wet mixture, fold well each time, until all of the flour is gone and you are left with a sticky dough. (Make sure not to over mix at this stage, just fold the dry mixture enough so that it is combined.)
  • The dough is now ready and should be slightly sticky, bring the dough together so that it is one big ball (You don’t need to knead it) and place into a bowl, covered in cling film / saran wrap and allow it to rest in the fridge for at least an hour

Making the Glaze

  • Make the vanilla glaze by combining, icing sugar, salt, vanilla, golden syrup / corn syrup and milk until you have a thin glaze that is solid in colour. It should be a light beige, almost white colour and be able to coat the back of a spoon and set this to the side

Frying the Doughnuts

  • Fill a heavy bottomed pan with 2L of oil and heat to 325°F
    In the meantime, set up a cooling rack with either parchment paper or paper towels underneath, to take the doughnuts out onto. Next to that, place a plate with a couple of chopsticks or skewers and a slotted spoon, now you're ready to fry. (more details in the blog post)
  • Carefully slide in the donuts one at a time, careful not to overcrowd the pan, or they won’t fry properly. Frying only 3 – 4 at a time.
    Fry for 2 minutes on either side, they should be very lightly golden on the outside and crackly on the top. Once fried, place them onto a cooling rack
  • Once the doughnuts are cool enough to handle, immerse them into the glaze and place on a cooling rack, (with some parchment paper underneath to catch any extra glaze) and the doughnuts are ready!

Notes

Use two chopsticks or long skewers to turn the doughnuts over as you fry them
Store the doughnuts in a airtight container or tin, once the glaze has fully set and store at room temperature at they should last for about 3 days
If you don’t have a rolling pin use can use a closed bottle of olive oil or wine instead
If you don’t like cinnamon  or nutmeg, simply leave it out, your doughnuts will be lighter and have a stronger vanilla flavour
To cut the doughnuts, use a doughnut cutter if you have one or, a cookie cutter or mug, with a small piping tip to cut out the centres
Add a little milk at a time, the amount of milk in the glaze will vary based on the weather, so just add a little at time
Remember: the heat will vary slightly so don’t worry if it goes over 325°F, just make sure the temperature of the oil doesn’t go over 350°F.
Keyword Donut, Dough, Doughnut, Vanilla
8th August 2022 0 comments
0 FacebookTwitterPinterestPocketEmail
Newer Posts
Older Posts

Hi, I'm Hunar!

Welcome to Ace of Spoons! My name is Hunar, and I'm a food blogger, photographer, and content creator based in the UK. This blog is all about creating delicious, foolproof recipes that are worth your time and effort in the kitchen. Whether you're a seasoned cook or just starting out, I want to provide you with recipes that are easy to follow and always turn out amazing.

Search

Popular Posts

  • 1

    No Bake Tiramisu Cheesecake

    12th September 2024
  • 2

    Classic Tiramisu Recipe

    19th December 2023
  • 3

    Viral Dubai Chocolate Cheesecake

    12th December 2024
  • 4

    No Oven Needed: No Bake Oreo Cheesecake Recipe

    5th September 2023
  • 5

    Biscoff Croissants (cookie butter croissants)

    24th January 2023

Instagram

  • Instagram
  • Pinterest
  • Email
  • Tiktok
Ace of spoons
  • Home
    • Home 1
  • Recipes
  • Categories
    • Main Dishes
    • Noodles
    • Breakfast
    • Vegetarians
  • About
  • Contact